Greenland northern lights: An Expedition Field Manual
Chasing the Greenland Northern Lights isn't a holiday. It's a mission. You don’t treat it like a tourist ticking a box; you approach it with the discipline of an expedition, where the aurora isn't just a spectacle—it's the reward for genuine Arctic fieldcraft, patience, and solid preparation in one of the planet's rawest environments.
An Expedition Approach to the Aurora
This is not your average travel guide. Think of it as a field manual for those who measure an experience by the skill it takes to earn it. Seeing the aurora in Greenland is not about just showing up. It's an exercise in planning, resilience, and quiet confidence in the face of profound cold and isolation. The real objective is simple: be in the right place, at the right time, with the right kit and the skills to operate effectively when you get there.
We are going to move beyond the standard advice and frame this whole undertaking with the same diligence we would apply to any polar objective. The focus here is on earning the view. That means understanding Greenland’s unique advantages—its stable inland climate, near-zero light pollution, and vast, empty landscapes—and using them strategically.
Core Principles for a Greenland Aurora Mission
A successful trip hinges on treating the aurora hunt with operational seriousness. This is about more than a quick look at a weather forecast. It demands a much deeper appreciation for the interplay between the environment and the opportunity it presents.
- Patience as a Discipline: Waiting for hours in temperatures that can plummet below -30°C (-22°F) is not just uncomfortable; it’s a test of your mental grit and your equipment. It requires the same focused patience as waiting out a blizzard in a tent, a skill honed by explorers from Shackleton to Ben Saunders.
- Location as a Strategic Choice: Picking a spot is not about convenience. It’s about identifying places like Kangerlussuaq ( 67°00′55″N ) for its high percentage of clear nights, or finding those remote sites only accessible by ski or dogsled.
- Competence Over Comfort: The most profound aurora experiences are found far from the warmth of a lodge. They belong to the self-sufficient explorer who understands that the real prize comes from applying learned skills in a properly challenging environment.
At its core, an aurora expedition in Greenland is an application of the Pole to Pole ethos: "we don't fight nature—we live in it." It’s about building the competence to not just survive, but to operate with purpose in the deep freeze of the Arctic winter.
This guide is structured to build that competence. We’ll cover the practical science needed for forecasting, the strategic selection of locations, the non-negotiable fieldcraft for operating at night, and the mindset required to see the objective through. Understanding the complex logistics of an expedition is a foundational step, and we'll detail exactly what it takes to get you and your equipment to the start line, ready for what’s ahead.
Decoding the Aurora for Mission Planning
Planning an expedition in Greenland with the northern lights as a mission objective means treating the science with the same respect we give a map and compass. You do not need to be an astrophysicist, but you do need to read the data to put your team in the right place at the right time.
Think of it as navigating celestial weather, not just the terrain beneath your feet.
At its core, the aurora borealis is a simple chain of events. The sun ejects a stream of charged particles – the solar wind – which travels across space towards Earth. Our planet's magnetic field acts like a giant funnel, guiding these particles towards the poles where they collide with atoms in the upper atmosphere.
Those collisions excite the atoms, forcing them to release energy in the form of light. That is the spectacle we see from the ground. The common green hue comes from oxygen at altitudes of around 100 to 300 kilometres (62 to 186 miles), whilst the rarer, deeper reds are also oxygen, but colliding much, much higher up.
Turning Science into Field Intelligence
Understanding these basics is what allows us to turn forecasting tools into genuine field intelligence. An expedition leader would not set off without checking the synoptic weather chart; in the same way, we do not ignore space weather data.
Right now, we are in a period of solar maximum , part of the sun’s roughly 11-year cycle. This translates to a massive increase in solar activity – more sunspots, more flares, and a far higher probability of strong auroral displays. It gives us a strategic edge, but it’s no guarantee. We still need to drill down into the short-term forecasts.
-
The Kp-index: This is your go-to metric, a global scale of geomagnetic activity from 0 to 9. In the UK, you might need a Kp of 5 or 6 to see anything. But in Greenland, deep inside the auroral oval, a Kp of just 2 or 3 can light up the entire sky. A higher Kp simply means faster, more dynamic, and more widespread displays.
-
Solar Wind Speed & Density: These two figures tell you how much fuel is being thrown at our planet. High-speed wind and dense particles are the difference between a faint glow and an explosive, overhead storm.
-
Bz Component: This is a bit more technical, but it is the trigger. It measures the orientation of the solar wind's magnetic field. A strong negative (southward) Bz is the critical ingredient – it opens the door for energy to flood into our magnetosphere, supercharging the aurora.
Success is found at the intersection of three key conditions: solar activity providing the fuel, clear local weather providing the viewing window, and a prepared team in a dark-sky location, ready to go.
By actively monitoring these variables with space weather apps, we shift from passively hoping to see the lights to actively planning for them. It’s no longer a waiting game. It becomes a critical part of the mission, dictating our movements and camp locations to maximise our chances of a successful observation.
It’s about using intelligence to get the timing right.
Where and When To See the Northern Lights
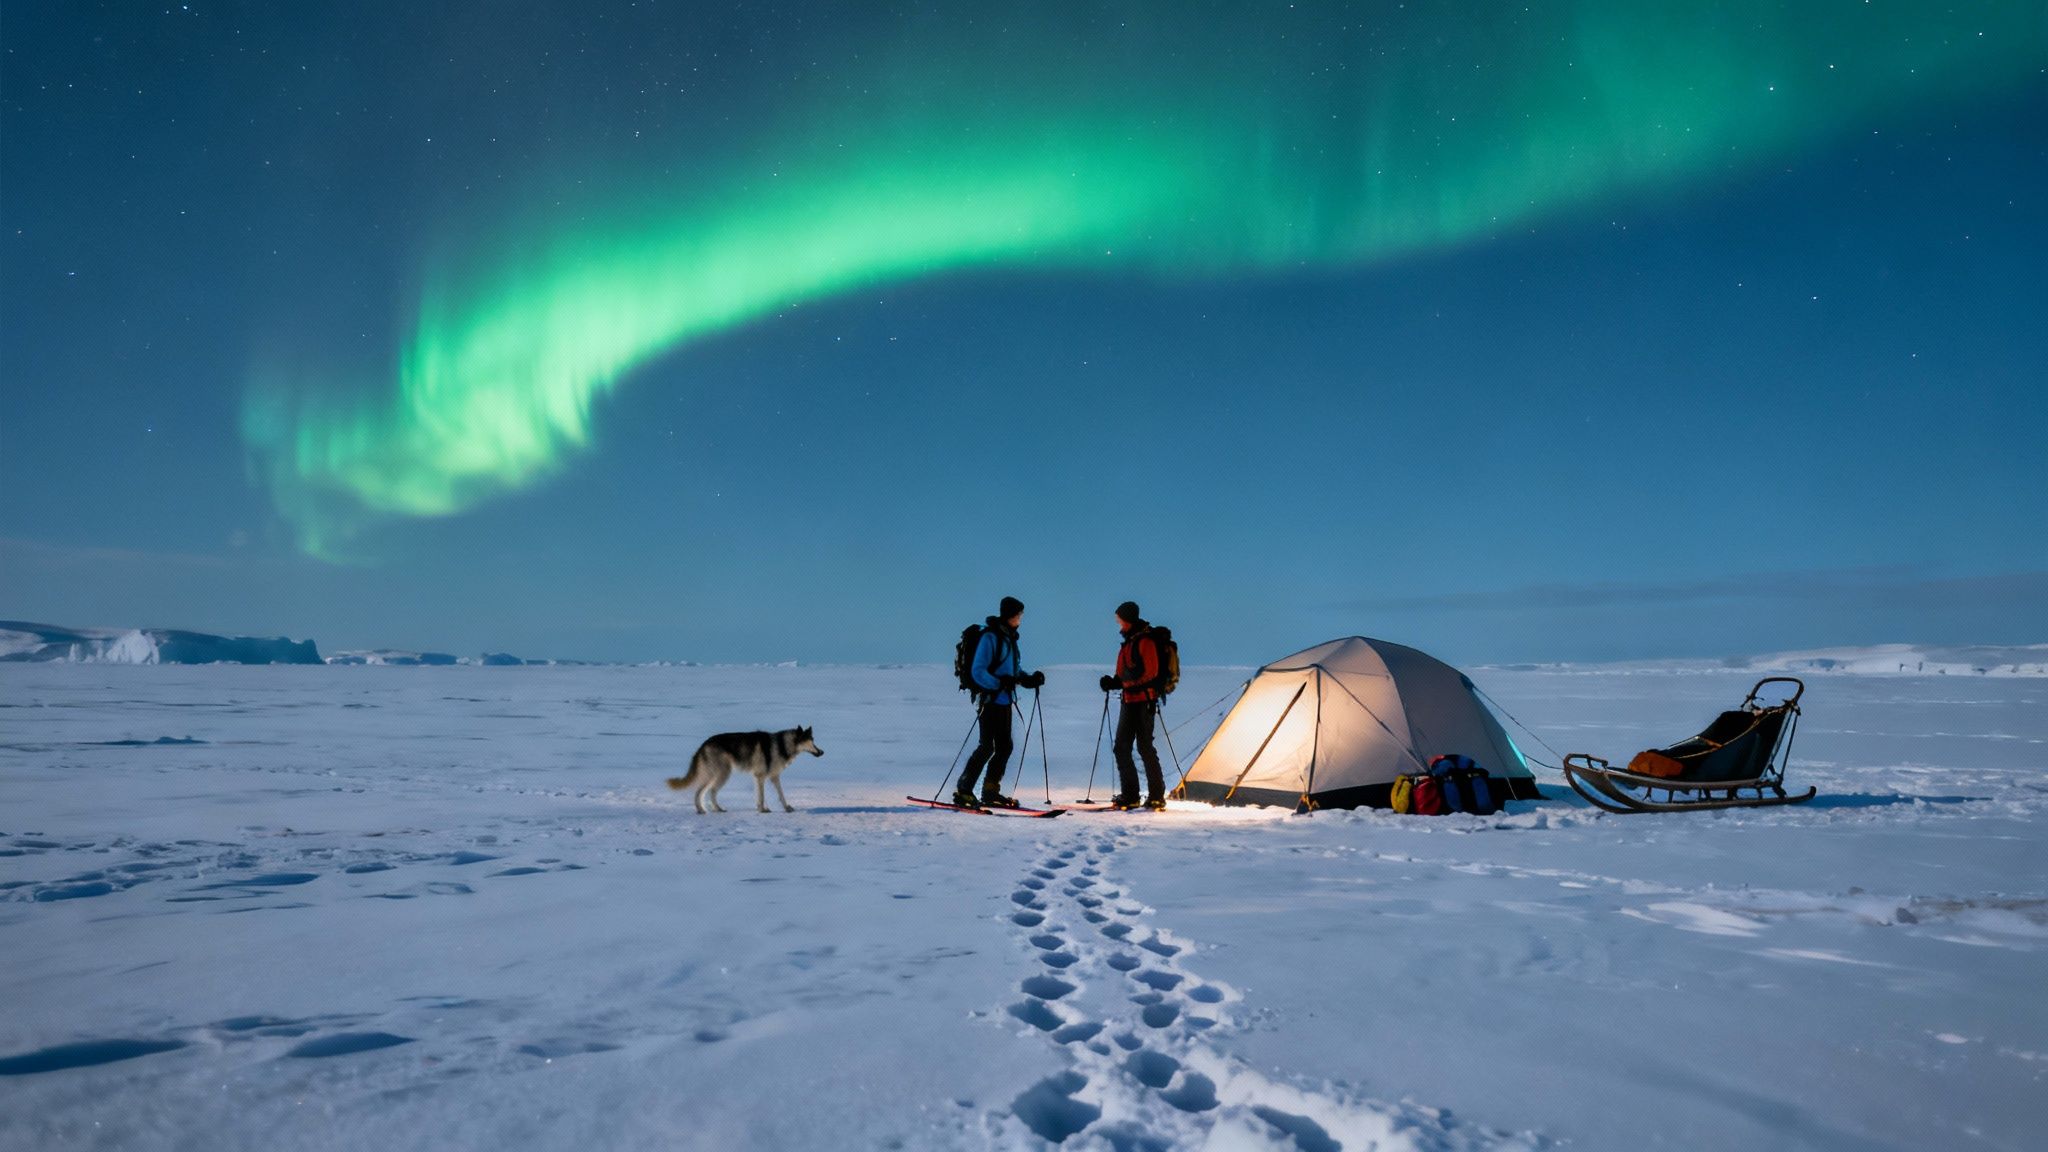
In a place as immense as Greenland, picking a spot to watch the aurora is not about convenience. It’s a strategic choice. The right basecamp can make or break an expedition, and that decision hinges on three things: stable weather, logistical support, and total darkness. An expedition is not a holiday; it’s about giving yourself the best possible odds of success.
We focus our operations from three primary hubs. They are not picked for their comfort, but for their raw geographical and climatic advantages.
Kangerlussuaq: The Reliable Inland Base
Kangerlussuaq ( 67°00′55″N ) sits at the very end of a 190-kilometre fjord, putting it deep inside Greenland’s landmass. This gives it an incredibly stable, continental climate, a world different from the wild, unpredictable weather battering the coast. The result? More clear nights than anywhere else in the country – often quoted as over 300 a year. That makes it a phenomenally reliable launchpad.
From here, you have direct access to the vast Greenland Ice Sheet. It’s the perfect location for anyone who wants to play the numbers game and is ready for the deep, biting cold that always accompanies those crystal-clear skies. For a deeper dive into the logistics of operating out of this area, take a look at our practical guide on travel to Greenland.
Ilulissat: Where Aurora Meets Ice
Push further north up the coast and you will find Ilulissat ( 69°13′N ), home to the UNESCO World Heritage Ilulissat Icefjord. The strategic advantage here is the backdrop. To see the aurora dance above colossal icebergs calved from the Sermeq Kujalleq glacier is an objective in its own right.
The trade-off is the weather. Being coastal, it’s far less predictable than Kangerlussuaq. An expedition based here has to be ready to wrestle with more cloud cover and storms. The reward for that gamble is a chance to witness the lights over one of the most dynamic and powerful glacial landscapes on Earth.
Tasiilaq: The Remote Eastern Frontier
For teams who are after true, profound isolation, Tasiilaq on Greenland’s east coast presents a completely different kind of challenge. It is more remote, logistically far more complex, and at the mercy of the brutal weather rolling in from the Denmark Strait. Planning an expedition here is not something to be taken lightly.
But the payoff is an experience of raw, untouched Arctic wilderness. The mountains feel sharper, the fjords cut deeper, and the sense of self-reliance is absolute. Seeing the aurora from this part of Greenland is something reserved for those with the skills, and the mindset, to operate almost entirely on their own.
Picking a location is always a trade-off. You are balancing the statistical certainty of clear skies in Kangerlussuaq against the sheer spectacle of Ilulissat or the profound emptiness of Tasiilaq. Your choice should come down to what you want to achieve, and what your team is capable of.
Understanding the Aurora Season
The season for seeing the northern lights in Greenland is dictated by one simple, non-negotiable factor: darkness. That window of opportunity opens around September and closes in early April , when the midnight sun finally retreats and lets the long, dark nights take over. But within that window, conditions change dramatically from one month to the next.
The best time to go really depends on the kind of expedition you’re looking for. The table below breaks down the key differences throughout the aurora season.
Seasonal Guide to Greenland Aurora Viewing
| Month | Darkness Hours | Average Temperature (Kangerlussuaq) | Primary Expedition Activity | Key Considerations |
|---|---|---|---|---|
| September - October | Increasing rapidly | Around 0°C to -10°C (32°F to 14°F) | Trekking, boating | Mild temperatures, less snow. Autumnal equinox can bring stronger solar activity. |
| November - January | Near-constant (Polar Night) | -20°C to -35°C (-4°F to -31°F) | Ice cap access, deep winter camping | Maximum darkness but extreme cold. Demanding on kit and people. Atmosphere is exceptionally clear. |
| February - April | Decreasing, but long nights remain | -15°C to -30°C (5°F to -22°F) | Dog sledding, ski touring | Peak snow cover. Sun returns, but nights are dark. Weather can be more unsettled. |
Let's break that down a bit more:
-
September to October: This is when the season kicks off. As darkness returns, the temperatures are still relatively mild, often hovering around freezing. The landscape is not yet buried in deep snow, which makes trekking a sound option. The autumnal equinox in September is often linked to a spike in geomagnetic activity, meaning a higher chance of a powerful display.
-
November to January: Welcome to the polar night. Up north, the darkness is almost constant, giving you the maximum possible hours for aurora hunting. This is also the coldest, most severe time of year. In the interior, temperatures can easily plummet to -35°C (-31°F) and below. That deep cold is brutal, but it creates incredibly crisp, clear atmospheric conditions – perfect for sharp aurora photography, but unforgiving on both people and equipment.
-
February to Early April: The sun starts its slow climb back, but the nights are still more than long and dark enough for incredible viewing. Snow cover is at its absolute deepest now, making this the prime time for dog sledding and ski touring expeditions. The weather can get a bit more volatile as winter begins to lose its grip, but the opportunities for combining aurora nights with classic Arctic adventures are second to none.
Essential Fieldcraft for an Aurora Expedition
Watching the Northern Lights in Greenland is not a spectator sport. It’s an exercise in managing extreme cold, and your success has very little to do with luck. It comes down to discipline. Good fieldcraft. The difference between a significant experience and a miserable night cut short is your systems, your kit, and your head. It’s about staying sharp when the temperature plummets and your body wants to quit.
The cornerstone of comfort, and survival, in the Arctic is a layering system that actively deals with moisture. This is not just about piling on clothes. Each layer has a job to do, and getting it wrong means sweat freezes against your skin, chilling you to the bone in minutes.
Building Your Layering System
A solid system has three parts, and each one is critical. The goal is simple: stay dry from the inside out and protected from the outside in.
-
Base Layer: Think of this as your second skin. Its only job is to pull moisture away from your body. Merino wool is the undisputed champion here. Brands like Fjällräven or Aclima make brilliant merino base layers that keep you warm even when damp and do not smell after days of use. Synthetics can work, but they just cannot compete with the all-round performance of good wool.
-
Mid-Layer(s): This is your insulation, designed to trap warm air. You need to be able to adapt this layer, maybe using one or two fleece or down jackets depending on how hard you’re working and how cold it is. A fleece gilet is useful for core warmth without restricting your arms, whilst a lightweight down jacket is perfect for throwing on when you’re standing still for hours, waiting for the sky to light up.
-
Outer Shell: This is your shield. It has to be windproof and highly water-resistant. In the dry cold of inland Greenland, a tough shell like a Gore-Tex Pro jacket is essential for blocking the wind, which is often a bigger threat than the temperature itself. It needs to be durable enough to take a beating.
This chart breaks down the probability of seeing the aurora in key Greenland locations, considering typical weather and how easy they are to reach.
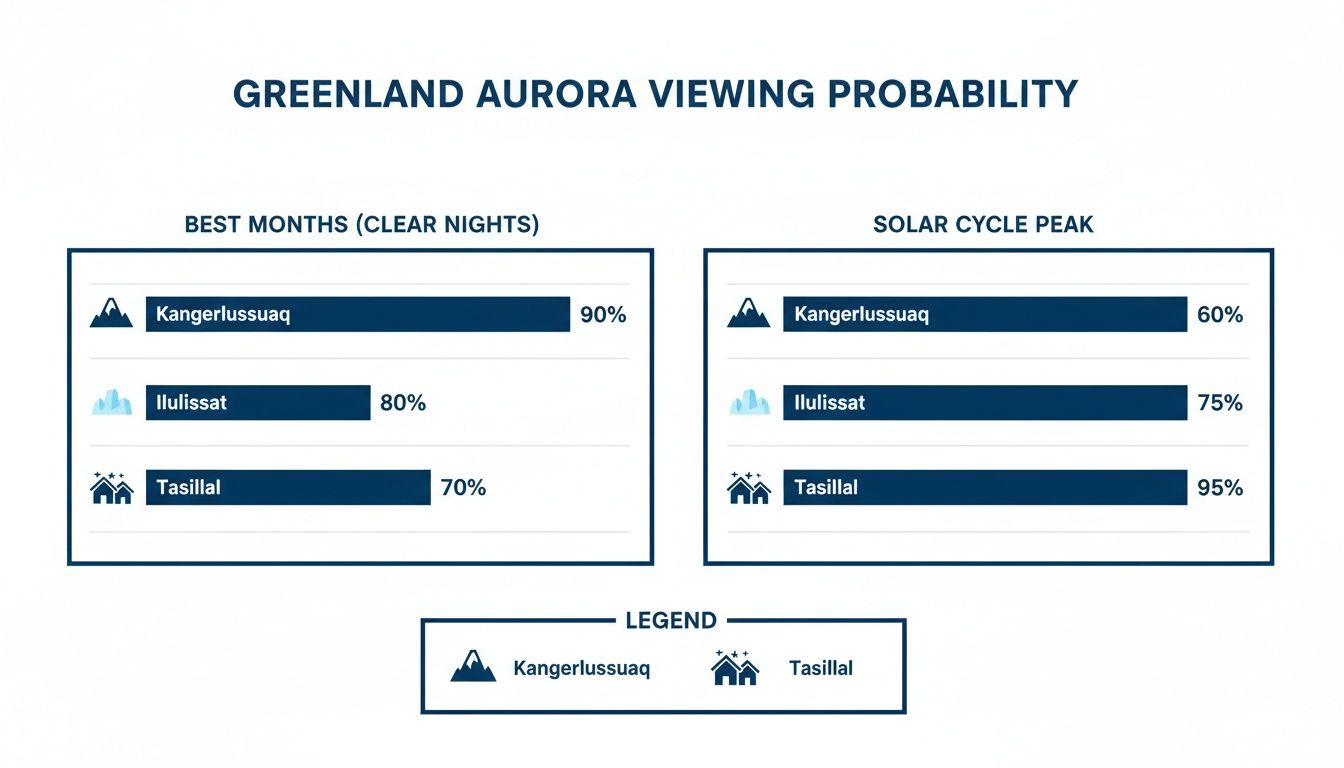
The data makes it clear why Kangerlussuaq’s stable inland climate makes it a better bet for an aurora-focused trip compared to the more unpredictable coastal spots.
Critical Kit for Night Operations
Beyond your clothing, a few pieces of equipment are non-negotiable for staying safe and effective during a long, cold night watch. Your hands and feet will be the first to go, so protecting them is everything.
You need insulated boots rated for at least -40°C (-40°F). Baffin or Sorel make expedition-grade boots that will keep your feet from turning into blocks of ice whilst you are standing on the snow for hours. In the same way, a dual system of thin liner gloves inside heavily insulated outer mitts is the only sound approach.
In the deep cold, simple tasks become complex. Mental preparation is about accepting this reality. It is the discipline to patiently operate a stove with numb fingers and the foresight to keep spare batteries warm in an inside pocket.
A reliable head torch with a red-light function is absolutely vital. Bright white light will wreck your night vision, and it can take thirty minutes for your eyes to readjust. Red light lets you sort out your kit or move around camp without ruining your ability to spot a faint aurora kicking off.
Finally, your stove is your lifeline. It melts snow for water and makes hot food possible. The MSR XGK-EX is an expedition classic for a reason: you can fix it in the field and it burns almost any fuel, which is a massive plus when you're in the middle of nowhere. Mastering how to use it in the cold before you leave home is a fundamental skill. For a deeper dive into our kit lists, you can read our guide on how much kit it takes to face the coldest place on Earth.
Documenting the Lights: A Practical Photography Guide
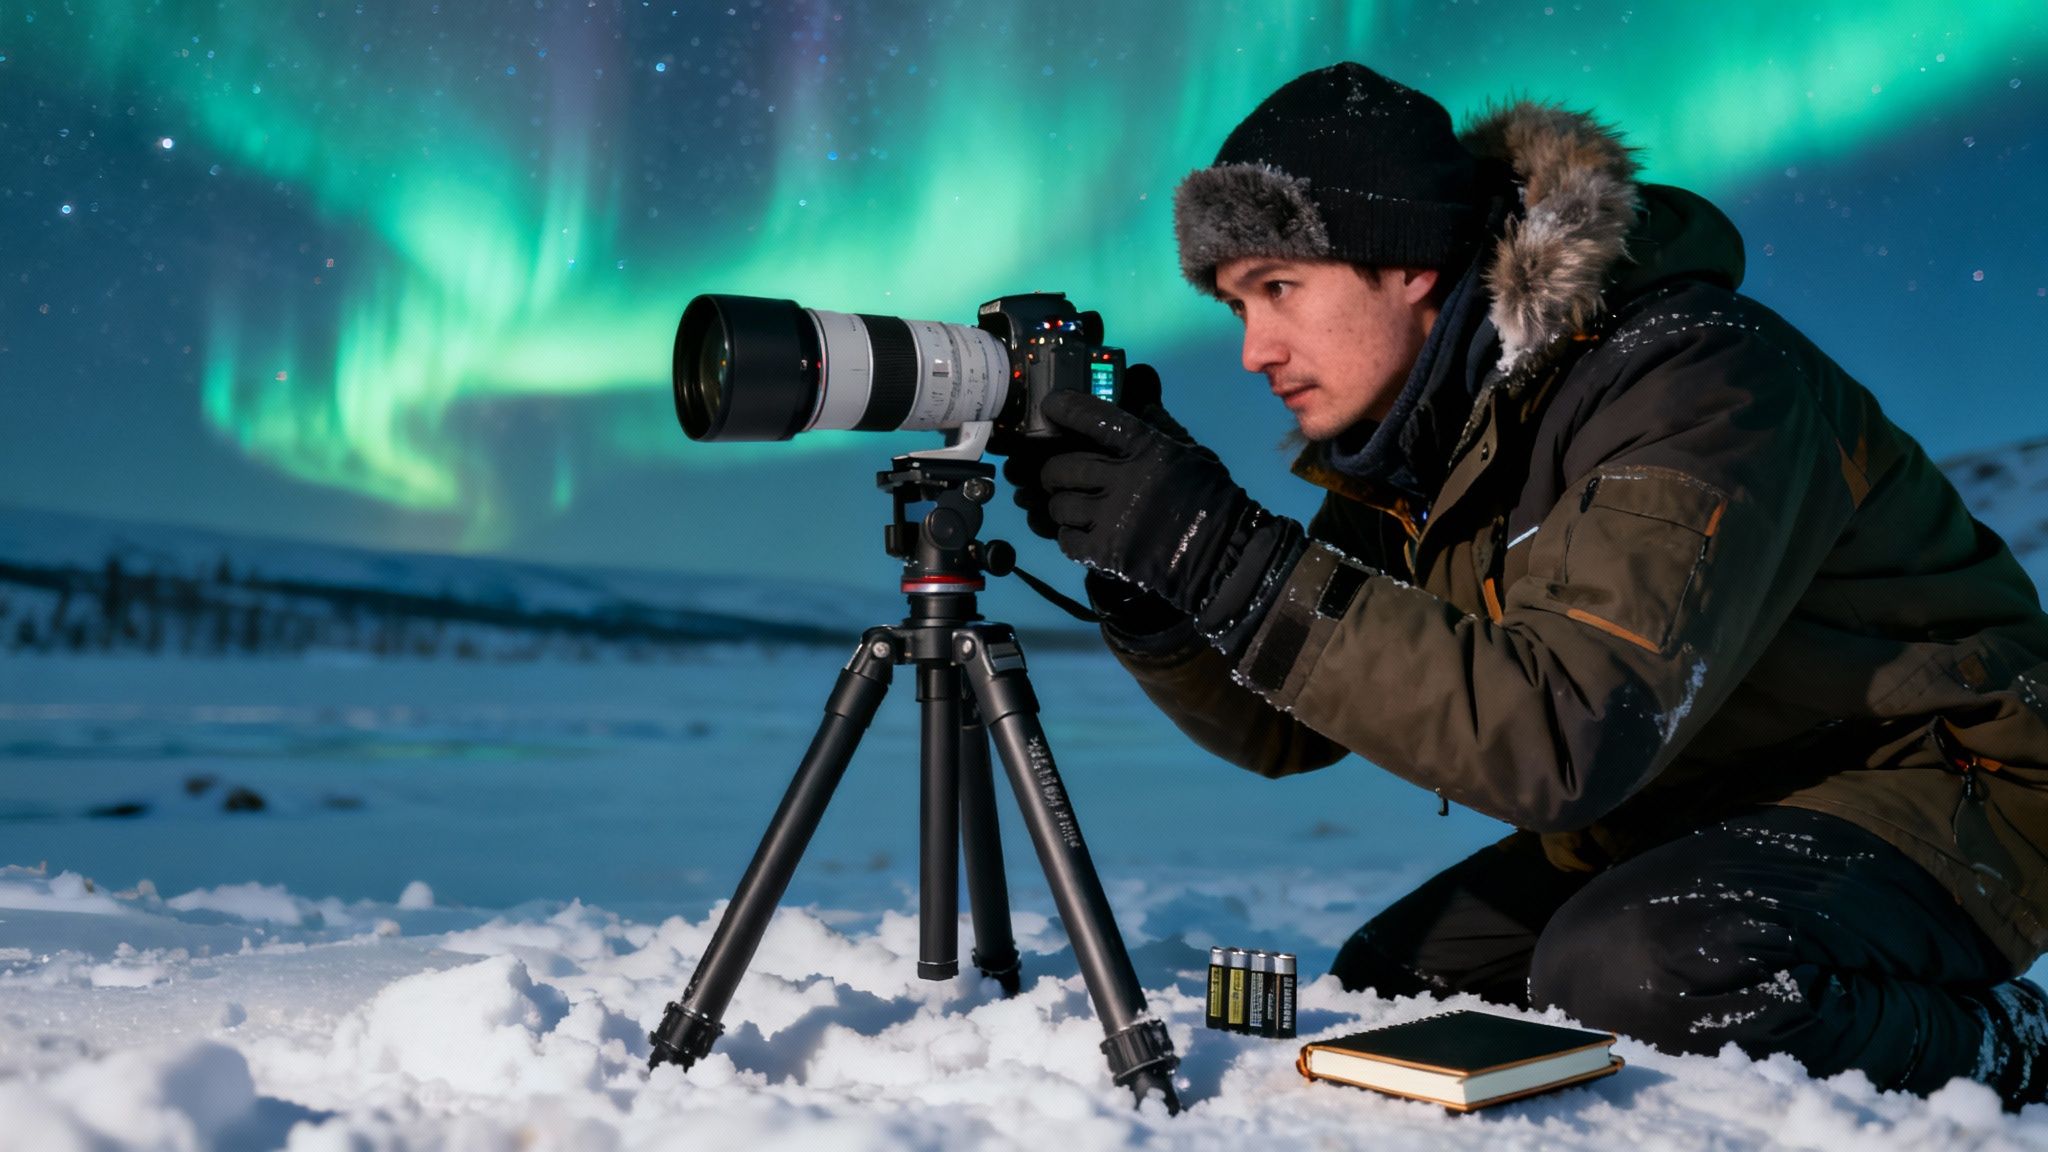
Photographing the aurora in the field is a technical skill, not an art project. The objective is to reliably document the experience, which requires preparation, discipline, and a solid understanding of how your kit behaves in extreme cold.
The environment is unforgiving. Fumbling with settings whilst wearing thick gloves at -30°C (-22°F) is not an option. Success starts long before you step out onto the snow, with gear that is robust, reliable, and can be operated entirely manually. Forget auto settings; they will fail you here.
Essential Camera Equipment
Your camera system has to be built for manual control and stability in harsh conditions. We do not pack anything that has not been field-tested in similarly demanding environments.
- Camera Body: A DSLR or mirrorless camera that allows full manual control over focus, aperture, shutter speed, and ISO is non-negotiable. Good battery life and some degree of weather sealing are essential.
- Lens: A fast, wide-angle lens is critical. Look for one with an aperture of f/2.8 or wider (like f/1.8). This allows your sensor to gather as much light as possible, meaning you can use shorter shutter speeds and lower ISO settings for cleaner images.
- Tripod: This is arguably your most important piece of gear. It must be sturdy enough to stay perfectly still in the wind, even on uneven snow. Flimsy travel tripods are a liability; choose a robust model with legs you can easily adjust with gloved hands.
Field-Tested Camera Settings
These settings are a reliable starting point. You will need to adjust them based on the brightness and speed of the aurora, but this foundation will get you operational quickly.
Set your camera to full Manual (M) mode.
- Focus: Set your lens to manual and turn it to the infinity symbol (∞). The best way to nail this is during the day: find a distant object, use your camera's live view, and zoom in to achieve perfect sharpness. Once it’s set, use gaffer tape to lock the focus ring in place.
- Aperture: Open your aperture to its widest setting (the lowest f-number, e.g., f/2.8 ). You want to let the maximum amount of light hit the sensor.
- ISO: Start with an ISO between 1600 and 3200 . For a very bright, fast-moving display, you might drop it lower. For a faint glow, you may need to push it to 6400 , but be aware this will introduce more noise.
- Shutter Speed: This is your main variable. Begin with a shutter speed of around 15 seconds . If the aurora is dancing quickly, shorten this to 5-10 seconds to capture more definition. For a slow, faint arc, you might extend it to 20-25 seconds .
The mission is documentation, not perfection. A sharp, well-exposed image that captures the moment is the goal. Chasing the perfect shot can lead to distraction, cold injuries, and missed opportunities to simply witness the event.
Finally, managing your kit in the cold is a practical challenge. Batteries will drain astonishingly fast, so keep at least two fully charged spares warm in an inside pocket.
When bringing a cold camera back into a warm tent or building, seal it in a dry bag before you go inside. This prevents condensation from forming on and inside the lens and body. It is a critical discipline that will protect your equipment.
Weaving the Aurora into a Pole to Pole Expedition
When you join a Pole to Pole expedition, the Greenland northern lights are never the only goal. They are the profound, silent reward for a hard day’s work—a spectacle earned through discipline, patience, and solid fieldcraft.
We do not run aurora tours. We build competent teams who, by mastering the Arctic environment, put themselves in the prime position to witness its greatest phenomena. The experience is woven into the very fabric of our training and expeditions; the skills required are one and the same.
Earned Views, Not Given Ones
The core skills we drill at the Pole to Pole Academy are the exact same ones that make a safe and successful aurora watch possible. This is what separates a genuine expedition from a simple holiday.
- Navigation and Positioning: Reading a map and trusting a compass in near-total darkness is not just a backup plan. It is what allows a team to move safely away from the faintest light pollution and choose a viewing spot with a vast, open sky.
- Camp Craft and Discipline: Efficiently pitching a Hilleberg tent. Firing up an MSR stove to melt snow for a hot drink. Keeping your kit meticulously organised. These are not chores; they are the routines that make waiting for hours in -30°C (-22°F) not just survivable, but sustainable.
- Cold-Weather Management: The layering systems and moisture control we teach are non-negotiable. They allow you to stay static for long periods without the deep, penetrating cold shutting you down, ensuring you are still effective when the sky finally ignites.
The patience needed for a multi-week Svalbard crossing is the same patience required for an aurora watch. It’s the discipline to maintain routines when you are tired and the focus to stick with the objective, no matter how distant it feels.
This approach changes everything. You are not a spectator hoping for a show. You are an active, self-sufficient team member who has earned their place in one of the world’s most demanding environments. True Arctic mastery is what makes these moments possible.
The Growing Need for Real Experiences
The pull towards this kind of authentic encounter is getting stronger. In 2024, the UK Northern Lights tourism market hit USD 66.0 million in revenue, and it’s projected to climb towards USD 112.0 million by 2030.
Ironically, recent aurora sightings over the UK have spiked demand for winter travel by 18% since 2019. People are getting a taste of the magic at home and now want the real thing, in the right place, at the right time. You can read more research about this growing market.
This trend highlights a shift away from passive sightseeing. People want meaningful, skill-based journeys. Our expeditions answer that call, integrating the pursuit of the aurora into a much larger story of personal challenge and competence.
It’s not just about seeing the lights. It’s about becoming the kind of person who can.
Your Greenland Northern Lights Questions, Answered
We receive a lot of questions about planning expeditions to see the lights in Greenland. Here are the most common ones, answered with the practical, self-reliant approach we take to everything we do. This is the core intelligence you need to start planning your own operation.
What Are My Chances of Actually Seeing the Aurora?
This is the big one. The honest answer? It depends entirely on your preparation.
In a prime spot like Kangerlussuaq during the middle of winter, the numbers are on your side. You’re looking at over 300 clear nights a year. But a statistic is not a guarantee. Success comes from committing to multiple nights out in the cold, ready to wait. The aurora is not a show that runs on a schedule. Think of it less as a probability, and more as an objective you earn through patience and solid fieldcraft.
How Cold Does It Actually Get?
Brutally cold. On the coast, expect temperatures to hover between -15°C and -25°C (5°F and -13°F). Head inland towards the ice sheet, and -35°C (-31°F) becomes the norm, often feeling much colder with wind chill.
This is not just uncomfortable; it’s a dry, biting cold that is completely unforgiving. Proper preparation is not a friendly suggestion—it’s a fundamental requirement for safety and success. Your layering system, insulated boots, and face protection are not just clothing; they are critical pieces of your operational kit.
Do I Need Previous Arctic Experience?
No, but what you do need is the right mindset and a genuine willingness to learn. A Greenland aurora expedition is an incredible entry point into the polar world, as long as you have the right support.
A successful trip is built on competence. This means understanding your equipment, mastering basic routines like firing up a stove in the biting cold, and having the discipline to manage yourself when you are tired and frozen. We build these skills from the ground up.
Is Greenland Difficult to Travel To?
Logistically, Greenland presents a few more challenges than, say, mainland Scandinavia. There are no roads connecting the towns. All travel is by small aircraft, or in winter, by dogsled or snowmobile. This demands careful, deliberate planning.
Flights usually connect through Copenhagen in Denmark or Reykjavik in Iceland. From there, you will take an internal flight to a hub like Kangerlussuaq or Ilulissat. It’s an involved journey that requires forethought—which, in itself, is a core part of any serious expedition.
At Pole to Pole , we do not just take you to see the aurora. We build expeditions that integrate the chase for the lights with the development of true Arctic competence. Explore our training programmes and guided journeys to begin your preparation. Find out more at poletopole.com.